
Post by Vice on Apr 12, 2007 16:44:19 GMT 1
I know this may be simple, but I like it and wanna share. ;D
1# Open a new file, I'm working on a 640×480 one.
2# Make a rectangular selection with the Rectangular Marquee Tool.

3# Open a new layer.
4# With the Paint Bucket Tool, fill the selection with black color [#000000].

5# Now go to Select/Modify/Contract... now contract by 25 pixels or so (by your likings).
6# Fill the selection with white color (#FFFFFF).
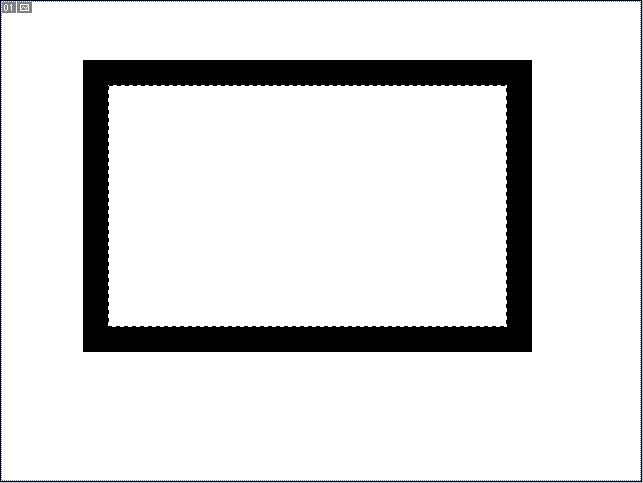
7# Press Control+D to deselect.
8# Now go to Layer/Layer Style/Bewel and Emboss...
Change the style to Pillow Emboss.
Hit OK.

9# Now press Control+T and tilt the layer to the left.
You also may want to move it a little to the left.
Double-click on it to save changes.

10# Create a new layer, then create an elliptical selection with the Elliptical Marquee Tool.
Make sure you're holding Shift+Alter while doing it.
After making it, try to move it as more as possible to the middle.

11# Fill the selection with some color, I'm using a red one (#DA1111).
Press Control+D to deselect.
Again, go to Layer/Layer Styles/Bewel and Emboss...
Select Pillow Emboss.
Hit OK.

12# Press Control+E once to merge the 2 layers together.
13# Now, open a random pic which you want to frame in.
14# Press Control+A and then Control C.
Then go to your original pic and press Control+V to paste.

15# Press Control+T, now you'll have to rotate and move the pic so that it aligns with one of the frame's edges.

16# Play around with the edges until you get the picture to fit in.
17# Again, do the Layer Style proccess.
18# You have a nice looking pinned pic!

19# If you want to make more of them, then select the layer in which the frame is (not the pic) and press control+J to duplicate it.
Now click and move that duplicated layer to the top of your layers panel.
20# Press Control+T, then move, rotate and resize the frame to your willings.

21# Repeat steps 13# to 17#.
22# You have 2 pinned pics!

23# Also, we could change the bacground a little bit, the white is too deppressing.
Open a pic which you'll use as a background.
24# Press Control+A and then Control C.
Then go to your original pic and press Control+V to paste.
25# Move its layer to the bottom of your layer panel.
26# Go to Filter/Blur/Gaussian Blur...
Make the blur around 3 pixels.
27# Your pic is ready, flatten the layers and you're done!

;D
1# Open a new file, I'm working on a 640×480 one.
2# Make a rectangular selection with the Rectangular Marquee Tool.
3# Open a new layer.
4# With the Paint Bucket Tool, fill the selection with black color [#000000].
5# Now go to Select/Modify/Contract... now contract by 25 pixels or so (by your likings).
6# Fill the selection with white color (#FFFFFF).
7# Press Control+D to deselect.
8# Now go to Layer/Layer Style/Bewel and Emboss...
Change the style to Pillow Emboss.
Hit OK.
9# Now press Control+T and tilt the layer to the left.
You also may want to move it a little to the left.
Double-click on it to save changes.
10# Create a new layer, then create an elliptical selection with the Elliptical Marquee Tool.
Make sure you're holding Shift+Alter while doing it.
After making it, try to move it as more as possible to the middle.
11# Fill the selection with some color, I'm using a red one (#DA1111).
Press Control+D to deselect.
Again, go to Layer/Layer Styles/Bewel and Emboss...
Select Pillow Emboss.
Hit OK.
12# Press Control+E once to merge the 2 layers together.
13# Now, open a random pic which you want to frame in.
14# Press Control+A and then Control C.
Then go to your original pic and press Control+V to paste.
15# Press Control+T, now you'll have to rotate and move the pic so that it aligns with one of the frame's edges.
16# Play around with the edges until you get the picture to fit in.
17# Again, do the Layer Style proccess.
18# You have a nice looking pinned pic!
19# If you want to make more of them, then select the layer in which the frame is (not the pic) and press control+J to duplicate it.
Now click and move that duplicated layer to the top of your layers panel.
20# Press Control+T, then move, rotate and resize the frame to your willings.
21# Repeat steps 13# to 17#.
22# You have 2 pinned pics!
23# Also, we could change the bacground a little bit, the white is too deppressing.
Open a pic which you'll use as a background.
24# Press Control+A and then Control C.
Then go to your original pic and press Control+V to paste.
25# Move its layer to the bottom of your layer panel.
26# Go to Filter/Blur/Gaussian Blur...
Make the blur around 3 pixels.
27# Your pic is ready, flatten the layers and you're done!
;D


 Thanks for sharing!


 ! Worse thing is i only have the old version of photoshop
  ! Adobe PhotoDuluxe 2.0
  ! *Sigh*
